How to install XAMPP & Composer on Linux – Debian

XAMPP by bitnami is a complete stack of Apache, MariaDB(MySql), PHP and Perl. It is a completely free software and widely used on all platforms for web development by developers. Although we have choice to install Apache, MySql and PHP separately on Linux platform easily but many developers choose to install XAMPP for Linux. This article will let you show how to install XAMPP and Composer on Linux – Debian.

XAMPP – Download

Download the latest version of XAMPP from its official website https://www.apachefriends.org by clicking on XAMPP for Linux on home page.

XAMPP – Installation

Open the terminal and navigate to the containing folder using cd command. Possibly your downloaded file will be in Downloads folder.

cd Downloads

Change the permission of file using chmod command. Replace your downloaded filename with xampp-linux-*-installer.run in below command.

sudo chmod 755 xampp-linux-*-installer.run

Execute the file

sudo ./xampp-linux-*-installer.run

You are all set to run XAMPP on your Linux machine.
To start, stop, restart XAMPP run the following commands.

sudo /opt/lampp/lampp start
sudo /opt/lampp/lampp stop
sudo /opt/lampp/lampp restart

Setting up Environment Variables

To install PHP technologies like composer, laravel, codeigniter and many others we need to set-up PHP path as an environment variable. Below are the steps to do this.

Open file /etc/environment as root using an Gedit –

sudo gedit /etc/environment

Add the following line at the end of file and then save and exit –

:/opt/lampp/bin/php

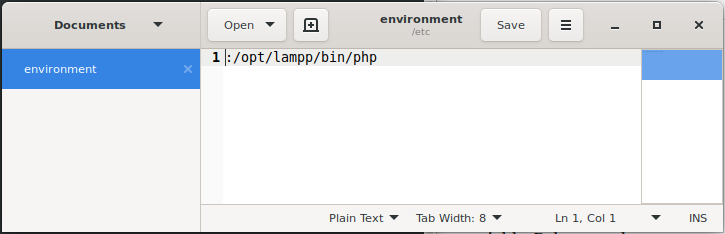
Now we need to create a symbolic link –

sudo ln -s /opt/lampp/bin/php /usr/local/bin/php

Composer – Installation

First we need to download composer using curl. If curl is not installed on your system, first install it using following command –

sudo apt-get install curl

then download composer

curl -sS https://getcomposer.org/installer | php

Now move composer to /usr/local/bin/composer folder using following command –

sudo mv composer.phar /usr/local/bin/composer
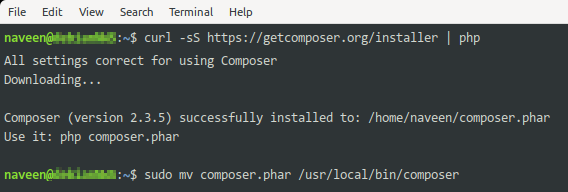
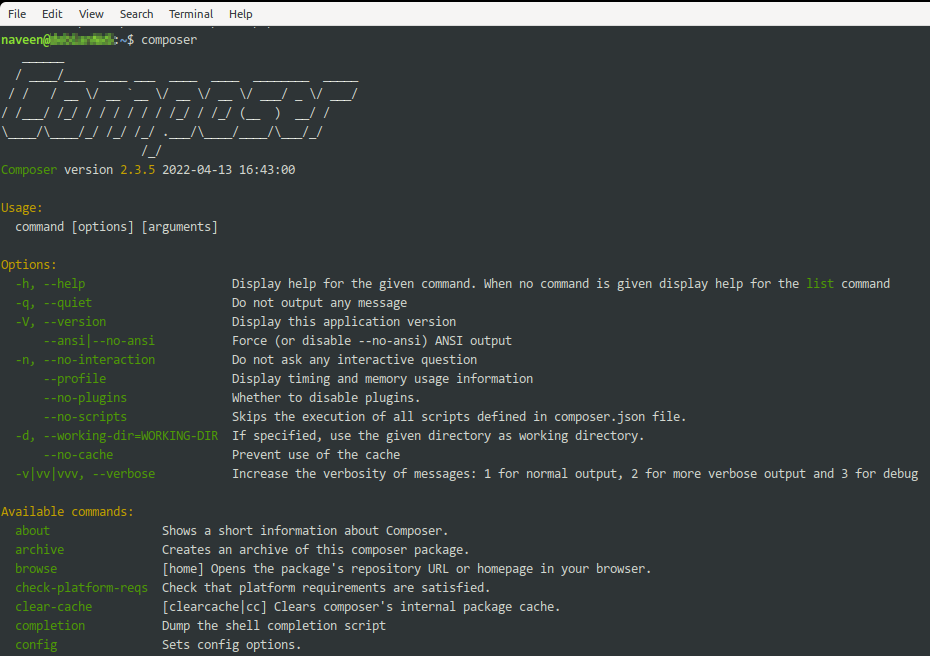
Done! All set.

Installing Adobe Acrobat Reader on Debian (10) Buster

Adobe Acrobat Reader is used to read/open PDF files, but wait debian buster already have Document Viewer to open PDF files then why do we need Acrobat Reader. None of the PDF viewer except Acrobat Reader in Linux is providing feature to validate signature, which we need sometimes to validate PDF documents. Just downloading AdbeRdr9.5.5-1_i386linux_enu.deb does not let you install Acrobat Reader directly on Debian Buster then how to do this?

Step : 1
First we require to add the i386 architecture using terminal command :

sudo dpkg --add-architecture i386
sudo apt-get update

Step : 2
Add library libxml2:i386 :

sudo apt-get install libxml2:i386

Step : 3
Download the Adobe Acrobat Reader (acroread) deb package here:

step : 4
Go to Downloads Folder and Install the deb package using terminal as follows :

cd ~/Downloads
sudo dpkg -i AdbeRdr9.5.5-1_i386linux_enu.deb

Terminal will through some error(s) but just avoid them and follow next step.

step : 5
Install the various dependencies require by the package (acroread) using following command.

sudo apt-get -f install

You are all set! Launch the Adobe Acrobat Reader from the terminal by :

acroread

How to automount usb drives in Debian (10) Buster?

Recently on a fresh installation of Debian Buster encountered the problem of automounting the external USB drives on my Dell N5010 Laptop. Didn’t faced such problem on Debian Stretch or older versions. After researching found that responsible package for automounting are udisks2 and libglib2.0-bin. udiskie is also responsible to automount USB drive. These all are properly installed, but didn’t working. Even due to this GParted was not opening. Even tried on the Terminal with sudo but it was showing message ‘Too few arguments’.

FIX :

Added a user systemd service to start udiskie:
/etc/systemd/user/udiskie.service with following code.

[Unit]
Description=Udiskie automount daemon

[Install]
WantedBy=graphical-session.target

[Service]
ExecStart=/usr/bin/udiskie --verbose --use-udisks2 --automount --no-config --notify --tray --appindicator

After rebooting this fixed the automounting the external USB drives and GParted too.